


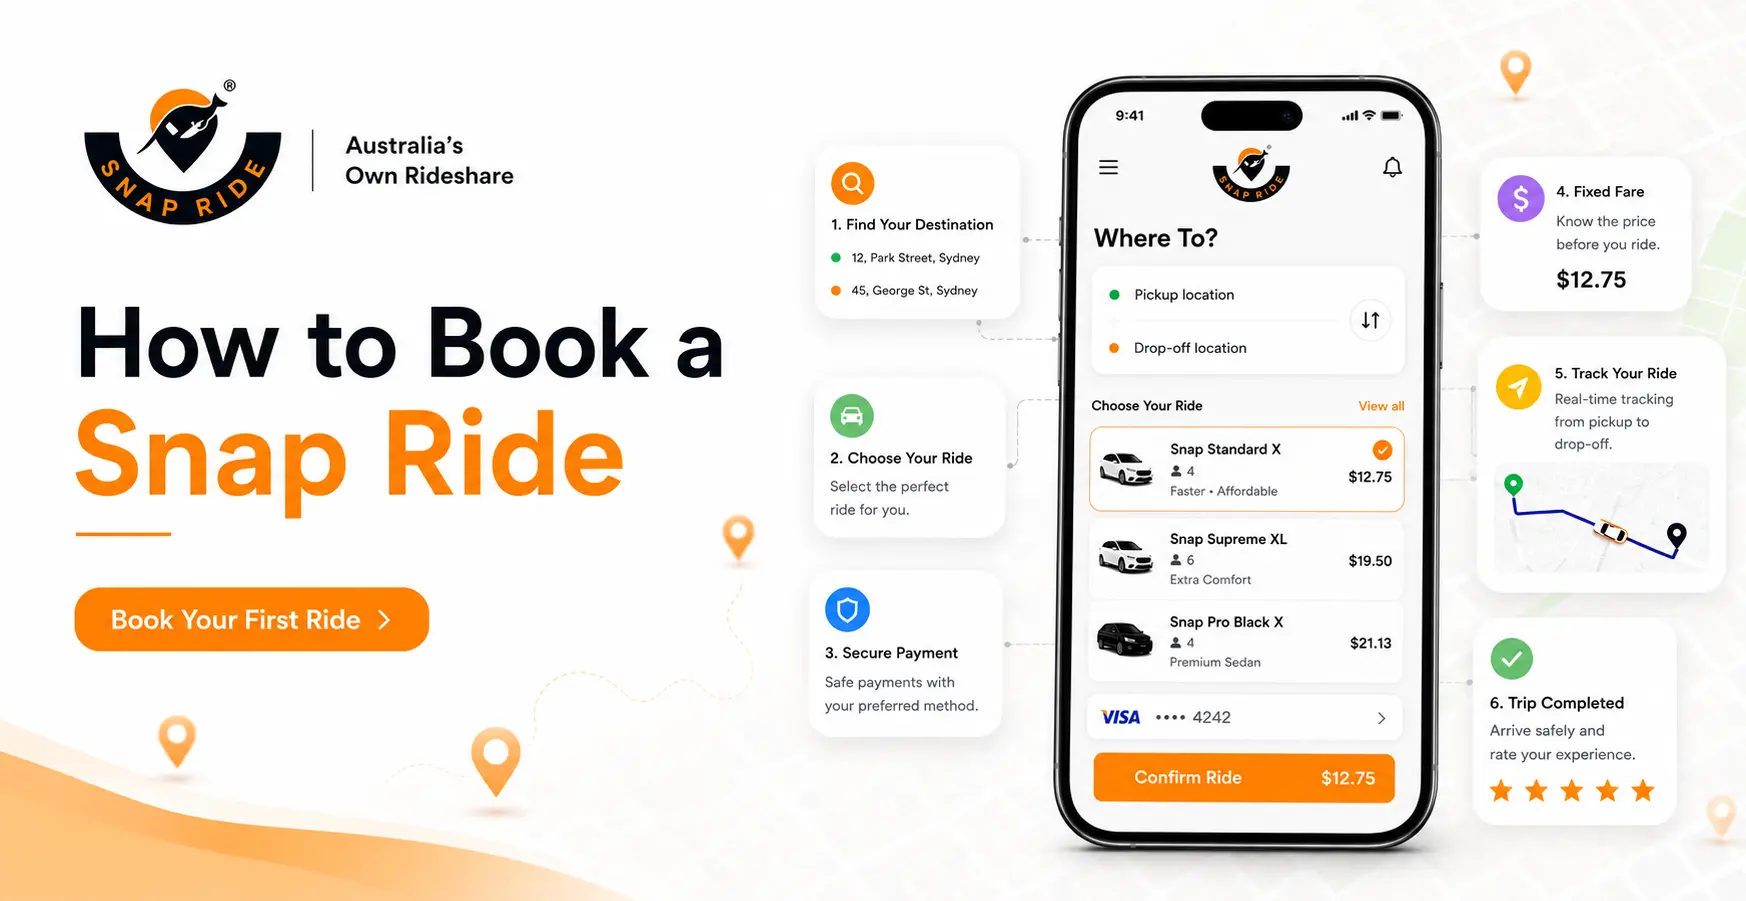
Opening a rideshare app for the first time usually comes with a few unanswered questions: what will this actually cost, who is picking me up, and what happens if something goes wrong? Australia’s Own Rideshare app Snap Ride answers all three before you ever confirm a trip, because the fare, the vehicle, and the driver's details are shown up front rather than discovered along the way. This guide walks through every step of booking a Snap Ride, from downloading the app to rating your driver at drop-off, so your first trip feels as familiar as your fiftieth.
Before You Book Your First Ride
A few setup steps stand between opening the app and requesting your first trip. Getting these right the first time means you are not troubleshooting permissions or a missing verification code when you actually need a ride.
Download the Rider App, Not the Driver App
Snap Ride runs two separate apps on the same network, one for riders and one for drivers, so downloading the correct one matters. The Snap Ride Rider app is available on the Apple App Store for iOS and the Google Play Store for Android. The driver app is built for vehicle registration, compliance documents, and payouts, and will not let you book a trip as a passenger, so check the listing matches the rider version before you install it.
Create Your Account
Setting up a Snap Ride account takes four pieces of information and one agreement. You will need an active email address and a password of at least 8 alphanumeric characters, and you must tick the box confirming you agree to the platform's terms of service before continuing.
- First and last name: enter these exactly as they appear on your ID, since this is what keeps the platform accountable for every trip.
- Email address: used to send an itemised, fixed-fare receipt after every ride.
- Australian mobile number: this has to match the SIM in your device, because it is used to verify your identity in the next step.
Verify Your Mobile Number
Mobile verification is where most new riders get stuck, so it is worth doing the first time carefully. After entering your details, tap the confirmation prompt and Snap Ride sends a 6-digit code by SMS. Enter that code into the app to confirm your identity. If nothing arrives within a minute, wait the full 60 seconds before requesting a second code rather than resending immediately. Requesting too quickly is the most common reason a code fails to land.
Turn On Location Access
Nearby drivers can only find you if the app can see where you are, which is why location access is requested before your first booking. When your phone asks for permission, choose “Allow While Using App” or “Always Allow.” Declining this permission stops the app from placing your pickup pin accurately and interrupts live tracking once a driver is on the way.

Step 1: Enter Your Pickup and Drop-off
Once your account is verified, the app opens straight into the booking screen. Tap the “Where To?” field to start entering your trip details.
Set Your Pickup and Destination
Snap Ride detects your current position automatically and drops a pickup pin on the map, though you can move or retype it if you are inside a large building, airport terminal, or industrial site where GPS placement is less precise. Enter your destination in the second field, and the app plots the route and shows nearby available vehicles immediately.
Book a Ride for Someone Else
You can book a Snap Ride on behalf of a family member, colleague, or friend without handing them your phone. Tap the “For Me” dropdown at the top of the destination screen and switch it to enter their pickup and drop-off details instead, while the trip still books through your account.
Add an Extra Stop
For trips that need a quick detour, dropping off a coworker or picking up something on the way, tap the plus icon next to the location fields to add a stop. The route and fare update immediately to reflect the full journey before you confirm the booking.
Step 2: Choose Your Ride Type
Snap Ride offers ten ride types, split by passenger capacity and comfort level, so the right choice usually comes down to how many people are travelling and how much luggage is coming with you.
|
Ride Type |
Capacity |
Best For |
|
Snap Standard X |
4 Passengers |
Affordable, reliable everyday commuting across town. |
|
Snap Standard XL |
6 Passengers |
Families, small groups, and extra luggage space. |
|
Snap Supreme X |
4 Passengers |
A smoother daily commute with elevated comfort. |
|
Snap Supreme XL |
6 Passengers |
Comfortable long trips or group outings with premium space. |
|
Snap Professional Black X |
4 Passengers |
A premium sedan experience with a professional driver. |
|
Snap Professional Black XL |
6 Passengers |
A luxury SUV for corporate groups, executive travel, or events. |
|
Snap Pet Ride |
3 Passengers |
Travelling safely and comfortably with a pet. |
|
Snap Ride MAX |
Large Group |
Maximum seating for large events, family trips, and airport transfers. |
|
Snap Cab X |
4 Passengers |
Traditional taxi service integration for standard local routing. |
|
Snap Cab XL |
6 Passengers |
Traditional taxi service with expanded seating capacity for groups. |
Luggage check: if you are booking a higher-capacity option like Snap Standard XL or Snap Ride MAX for a group with heavy luggage, confirm the load fits comfortably before the driver arrives. An overloaded vehicle breaches state road rules, and the driver is entitled to decline the trip at pickup.
Step 3: Confirm Your Fare and Payment
This is the step that removes the biggest source of rideshare anxiety: not knowing what a trip will cost until it is over. Snap Ride shows the full fare before a driver is even matched to your trip.
Why the Fare Doesn't Change After You Book
Snap Ride calculates your fare from distance and ride type the moment you enter a destination, and that number does not move once you confirm it. There is no surge multiplier during storms, Friday night peak hours, or straight after a concert or football match lets out. Riders who have been caught out by how Snap Ride's fixed-fare structure works before deciding whether to switch from a legacy app can see exactly what shows on screen versus what lands on the final receipt they match.
How Payment Is Authorised
A valid card or digital wallet has to be linked to your account before you can book, since Snap Ride does not accept cash. Confirming your ride type triggers a pre-authorisation hold for the exact fare shown on screen, which secures the payment method before a driver is assigned. The actual charge is only captured once the trip ends, so nothing is deducted from your account mid-journey.
Step 4: Get Matched and Verify Your Driver
With payment authorised, Snap Ride's matching system looks for the closest available driver in your chosen ride category and assigns them automatically.
What Happens During Matching
Matching happens in the background as soon as your fare is confirmed, and the app updates with your driver's details the moment they accept the trip. There is nothing further to tap or confirm on your end while this is happening.
Checks to Make Before You Get In
- Name and photo: the driver's legal name and a clear profile photo appear before arrival; match the face to the person at your door.
- Vehicle details: make, model, colour, and number plate are all shown, so you can confirm the car pulling up is the right one.
- PTD accreditation: every driver's official Passenger Transport Driver code is displayed, confirming they are licensed to carry paying passengers.
- One simple habit: check the plate against the app before opening the door. Every time it takes a few seconds, and it is the single most reliable safety check available to you.
Step 5: Track Your Ride
Once a driver accepts your trip, the app switches into live tracking so you always know where your ride actually is.
Three Stages of Tracking
- Arriving: watch your driver's live position and a countdown timer as they head to your pickup point.
- Picked Up: the map shifts to your destination route the moment you get in, and the driver starts the trip.
- Approaching Destination: as you near the drop-off point, the app shows nearby landmarks so you know when to prepare to get out.
Contact Your Driver Without Sharing Your Number
If you need to give directions or find your driver in a busy pickup zone, use the in-app chat or call function rather than texting a number. Snap Ride routes every call and message through a masked connection, so neither of you sees the other's real mobile number.
Use the Emergency Button if You Need To
A dedicated emergency button stays visible on the main trip screen for the entire journey, not tucked away in a settings menu. Tapping it connects you to local emergency response without having to search through the app first.
Step 6: Complete Your Trip and Pay
When you reach your destination, the driver ends the trip in the app, and the payment step happens without any action from you.
Automatic, Cashless Payment
Because your fare was already authorised at booking, there is no card to tap or cash to hand over in the vehicle. The final amount is captured automatically from your linked payment method, and an itemised tax receipt lands in your email inbox shortly after.
Rate Your Driver and Add a Tip
A short rating screen appears immediately after drop-off, where you rate the trip from 1 to 5 stars and can select quick tags for things like vehicle cleanliness or communication. Drivers rate riders too, which keeps accountability even on both sides.
- Star rating: a quick 1-to-5 score based on how the trip actually went.
- Quick tags: one-tap feedback on cleanliness, driving, or communication, without typing a review.
- Optional tip: choose an amount between $2 and $20 through the app; the full amount goes to the driver.
Tips for Your Smooth First Trip
- Check that location services are switched on for Snap Ride before you try to book.
- Confirm your linked payment method has enough available balance to cover the pre-authorisation hold.
- Double-check your pickup pin matches where you are actually standing, especially in dense city blocks.
- Match the number plate and driver's name in the app before you open the car door.
- Select Snap Pet Ride if you are travelling with an animal, rather than a standard ride type.
Conclusion
Booking a Snap Ride follows the same six steps every time: set your account up once, enter where you are going, pick the right vehicle, confirm a fare that will not move, check your driver before you get in, and rate the trip when it ends. None of it depends on guessing what a surge multiplier might do to your fare that day.
If unpredictable pricing or unclear driver details have put you off booking a ride in the past, a fixed fare shown before you commit changes that calculation. Download the Snap Ride app and book your first trip today.